Understanding Attribute Gage R&R
The tool used for this kind of analysis is called attribute gage R&R. The gage R&R stands for repeatability and reproducibility. Repeatability means that the same operator, measuring the same thing, using the same gage, should get the same reading every time. Reproducibility means that different operators, measuring the same thing, using the same gage, should get the same reading every time.
Although, gage R&R is based on two-proportion test, obtaining these percentages can be done with simple mathematics only. And there is really no need for sophisticated software. Nevertheless, some statistics software such as Minitab or SigmaXL have a module called Attribute Agreement Analysis that does the same and much more, and this makes analysts’ lives easier.
Steps to Calculate Gage R&R
Setting Up the Attribute Measurement System Analysis
Step 1: Select between 20 to 30 test samples that represent the full range of variation encountered in actual production runs. Practically speaking, if we use “clearly good” parts and “clearly bad” parts, the ability of the measurement system to accurately categorise the ones in between will not show. For maximum confidence, a 50-50 mix of good/bad parts is recommended. A 30:70 ratio is acceptable.
Step 2: Have a master appraiser categorize each test sample into its true attribute category.
Step 3: Select two to three inspectors who do the job. Have them categorize each test sample without knowing what the master appraiser has rated them.
Step 4: Place the test samples in a new random order and have the inspectors repeat their assessments.
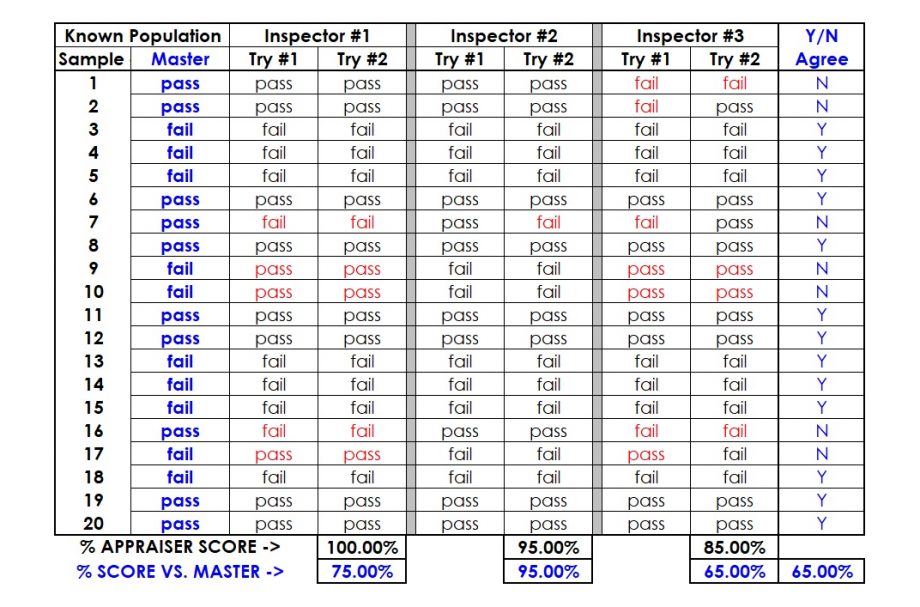
Step 5: For each inspector, count the number of times his or her two readings agree. Divide this number by the total inspected to obtain the percentage of agreement. This is the individual repeatability of that inspector.

Understanding the Results
Step 6: Compute the number of times each inspector’s two assessments agree with each other and also the standard produced by the master appraiser in Step 2.
Step 7: Compute the percentage of times all the inspectors’ assessments agree for the first and second measurement for each sample item.
Step 8: Compute the percentage of the time all the inspectors’ assessments agree with each other and with the standard.
Finally, this percentage gives the overall effectiveness of the measurement system. The result is 65%. Hence, this is the percent of time all inspectors agree and their agreement matches with the standard.
So What If the Gage R&R Is Not Good?
- Identify what is to be measured.
- Select the measurement instrument.
- Develop the test method and criteria for pass or fail.
- Test the test method and criteria (the operational definition) with some test samples (perform a gage R&R study).
- Confirm that the gage R&R in the study is close to 100 percent.
- Document the test method and criteria.
- Train all inspectors on the test method and criteria.
- Pilot run the new test method and criteria and perform periodic gage R&Rs to check if the measurement system is good.
- Launch the new test method and criteria.
Interested in more details? Read here.

